
Welcome to the Applying Security Protocols Practice Lab. In this module, you will be provided with the instructions and devices needed to develop your hands-on skills.
In this module, you will complete the following exercises:
- Exercise 1 – Configuring Standard and Extended Access Lists
- Exercise 2 – Configuring Named Access Lists
- Exercise 3 – Configuring Access-Lists to Restrict Remote Access
- Exercise 4 – Configuring Layer 2 Security Features
After completing this lab, you will be able to:
- Create Standard Access-Lists
- Create an Extended Access-List
- Configure a Named Access-List
- Configure Remote Access
- Configure DHCP Snooping
- Configure Dynamic ARP Inspection
- Configure Port Security
Exam Objectives
The following exam objective is covered in this lab:
- 5.6 Configure and verify access control lists
- 5.7 Configure Layer 2 security features (DHCP snooping, dynamic ARP inspection, and port security)
Lab Topology
During your session, you will have access to the following lab configuration.

Depending on the exercises, you may or may not use all of the devices, but they are shown here in the layout to get an overall understanding of the topology of the lab.
- NYEDGE1 (Cisco 2911 – Internet Edge Router 1)
- NYEDGE2 (Cisco 2911 – Internet Edge Router 2)
- NYWAN1 (Cisco 2911 – WAN Router)
- NYCORE1 (Cisco 3750v2 – 24PS – Core Switch 1)
- NYCORE2 (Cisco 3750v2 – 24PS – Core Switch 2)
- NYACCESS1 (Cisco 2960-24 – Access Switch 1)
- PLABCSCO01 (Windows Server 2012 R2 – Cisco Tools Server)
Booted up machines, waited for NYEDGE1 to startup before starting PLABCSC001
Exercise 1 – Configuring Standard and Extended Access Lists
Access Control Lists (ACL) are used for filtering traffic passing through an interface based on a specific criterion, for example, IP address or specific ports. Two different types of access list can be configured:
- Standard Access List – A standard access list is used for filtering traffic based on a source IP address.
- Extended Access List – An extended access list provides more filtering criteria. You can add filtering based on source and destination IP address as well as source and destination ports.
Task 1 – Creating Standard Access-Lists
There are two types of access lists, standard and extended. These access lists can be referred to either by a name or a number, depending on how you configure them.
The difference between the two types of access lists is the granularity of the filtering that each provides. For example, a standard access list will only filter based on source address or network.
This can be seen in the result of the context sensitive help below:
NYEDGE1#configure terminal
NYEDGE1(config)#access-list 1 permit ?
  Hostname or A.B.C.D  Address to match
  any                  Any source host
  host                 A single host address
NYEDGE1(config)#access-list 1 permit 192.168.16.0 0.0.0.255 ?
  log       Log matches against this entry
  smartlog  Smartlog matches against this entry
In the above output, the ? shows the options you have available at two different points before a network address is entered you can see that you can enter the source address details.
Once you have entered those, you only have logging options.
In this task, you will create a standard access list on NYEDGE1.
COMMAND: access-list 1 permit
Step 1
Connect to NYEDGE1.
This access list will match a single device on the network, specifically the PLABCSCO01 server.
Create a numbered access that matches the address of the server, which is 192.168.16.10, and chose the action to deny.
Type the following commands (press Enter after each command):
NYEDGE1#
configure terminal
NYEDGE1(config)#
access-list 10 deny host 192.168.16.10
NYEDGE1(config)#
exit
Note:
When configuring an access list to refer to only one host, you have two options. Either you use the host keyword as you have done above, or by including the IP address and a wildcard mask which indicates a host. The resulting command would be
access-list 80 deny 192.168.16.10 0.0.0.0
. Both commands would give the same result.
Step 2
To view the access lists you created, issue the following command:
NYEDGE1#
show access-lists
Press Enter.
You will see the following output:
NYEDGE1#show access-lists
Standard IP access list 10
    10 deny   192.168.16.10
Standard IP access list NAT
    10 permit 192.168.16.0, wildcard bits 0.0.0.255
NYEDGE1#
This command displays all of the access lists configured on the router.
Note:
The NAT access list has been preconfigured to enable NAT to function. This will be used later on in this lab.
COMMAND: show access-lists
Step 3
As there is an implicit deny at the end of each access list, you will need to include a permit statement. Otherwise, everything will be blocked. Type the following commands to allow all other traffic (press Enter after each command):
NYEDGE1#
configure terminal
NYEDGE1(config)#
access-list 10 permit any
You will see the following output:
NYEDGE1#configure terminal
Enter configuration commands, one per line.  End with CNTL/Z.
NYEDGE1(config)#access-list 10 permit any
NYEDGE1(config)#
Step 4
At this point, the access list has just been defined. It has not been applied anywhere, so filtering is not yet taking place. You must bind this access list to an interface.
Careful consideration needs to be taken when applying access lists.
Should it be placed as close as possible or as far away as possible from the source?
In what direction should it be applied?
For example, should you put place the access list on interface GigabitEthernet 0/0 or 0/1, and in what direction?
In this step, you will place the access list on GigabitEthernet 0/1 in an outbound direction.
Type the following commands (press Enter after each command):
NYEDGE1(config)#
interface gigabitethernet 0/1
NYEDGE1(config-if)#
ip access-group 10 out
NYEDGE1(config-if)#
exit
NYEDGE1(config)#
exit
You will see the following output:
NYEDGE1(config)#interface gigabitethernet 0/1
NYEDGE1(config-if)#ip access-group 10 out
NYEDGE1(config-if)#exit
NYEDGE1(config)#exit
NYEDGE1#
Note:
To help you understand directions, imagine yourself sitting on top of the router and marble is the traffic, if the marble is coming towards you then it is inbound if the marble is rolling away from you then it is outbound.
COMMAND: int g0/1 (Selects interface to configure) ip access-group 10 out (defines which access-group rules to apply to interface and defines direction of traffic rules are applied to)
Step 5
Connect to PLABCSCO01 and open command prompt by right-clicking on the Windows charm and selecting Command Prompt (Admin).
Type the following command in the terminal window:
ping www.practice-labs.com
Press Enter.
Ping was successful
Step 6
Connect to NYEDGE1.
Observe the access list hits, using the following command:
NYEDGE1#
show access-lists
Press Enter.
You will see the following output:
NYEDGE1#show access-lists
Standard IP access list 10
    10 deny   192.168.16.10
    20 permit any (4 matches)
NYEDGE1#
My Output: Also shows NAT
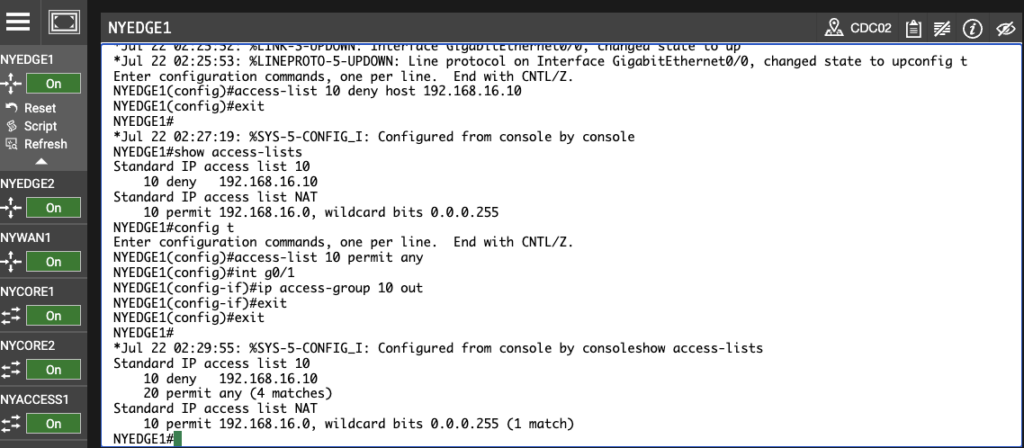
You can see from the above output that there were four matches on the permit any line and no matches on the deny 192.168.16.10 line of the access list.
Examining the configuration once again, you may realize that something is wrong. If the PLABCSCO01 server has an IP address of 192.168.16.10, then the pings should be denied and not permitted. Why is the incorrect line being matched? Let’s find out.
Step 7
The placement of the access list is very important.
Because NAT is operating on this router, the source address of the server is being translated. When the packet in question is exiting the GigabitEthernet 0/1 interface on which the access list was applied, it no longer has 192.168.16.10 as a source address. It has been translated by NAT.
Therefore you must either change the access list placement and direction to GigabitEthernet 0/0 inbound, or you must modify the access list to match the translated IP address.
The best choice would be to change the placement and direction. Remove the access list from the GigabitEthernet 0/1 interface and place it on 0/0 in an inbound direction.
Type the following commands (press Enter after each command):
NYEDGE1#
configure terminal
NYEDGE1(config)#
interface gigabitethernet 0/1
NYEDGE1(config-if)#
no ip access-group 10 out
NYEDGE1(config-if)#
exit
NYEDGE1(config)#
interface gigabitethernet 0/0
NYEDGE1(config-if)#
ip access-group 10 in
NYEDGE1(config-if)#
exit
NYEDGE1(config)#
exit
You will see the following output:
NYEDGE1#configure terminal
Enter configuration commands, one per line.  End with CNTL/Z.
NYEDGE1(config)#interface gigabitethernet 0/1
NYEDGE1(config-if)#no ip access-group 10 out
NYEDGE1(config-if)#exit
NYEDGE1(config)#interface gigabitethernet 0/0
NYEDGE1(config-if)#ip access-group 10 in
NYEDGE1(config-if)#exit
NYEDGE1(config)#exit
NYEDGE1#
My Output:
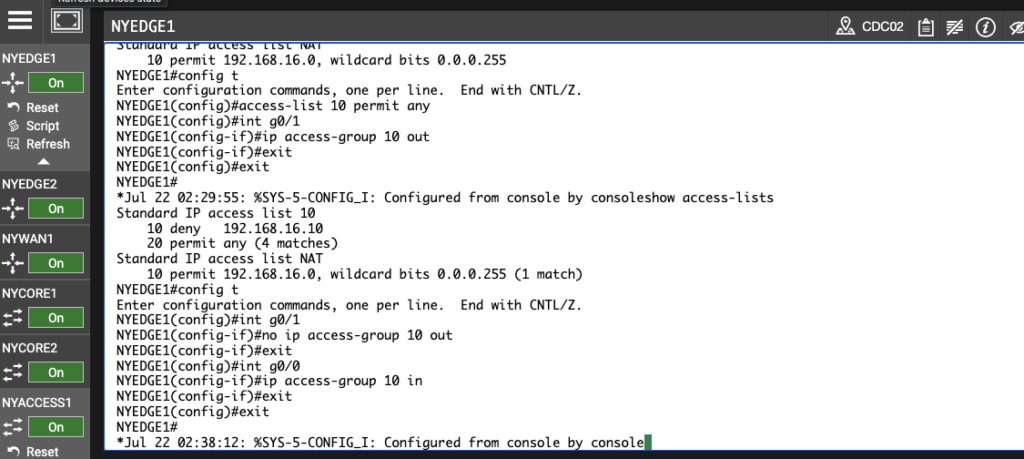
COMMAND: no ip access-group 10 out (Removes access list rules from interface)
Step 8
Reconnect to PLABCSCO01.
Retry the ping from PLABCSCO01 once more:
ping www.practice-labs.com
Press Enter.
Ping was now unsuccessful
Step 9
Connect to NYEDGE1.
In the NYEDGE1 router, view the access list again by issuing the following command:
NYEDGE1#
show access-lists
Press Enter.
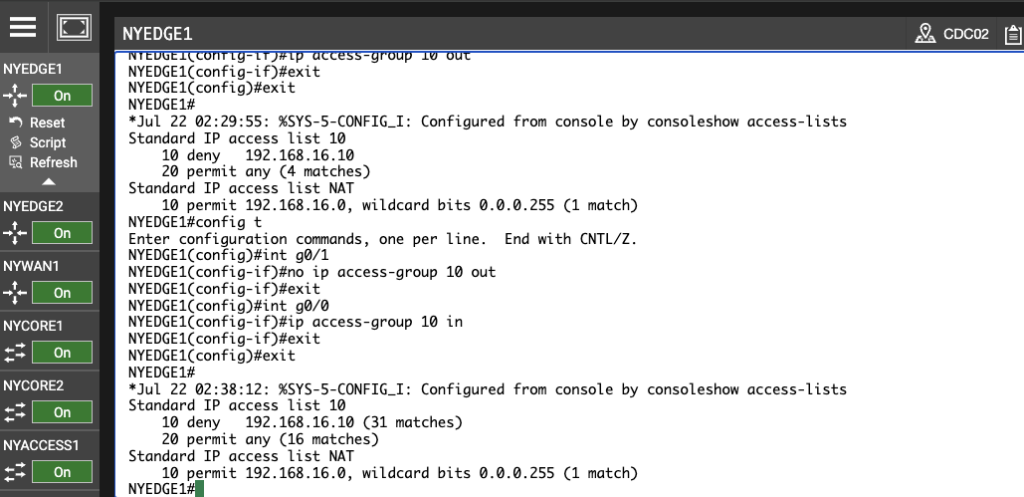
The output will be as follows:
NYEDGE1#show access-lists
Standard IP access list 10
    10 deny   192.168.16.10 (8 matches)
    20 permit any (19 matches)
Standard IP access list NAT
    10 permit 192.168.16.0, wildcard bits 0.0.0.255 (1 match)
NYEDGE1#
You now see that there are matches on the deny line of the access list, meaning the access list denied the pings you sent.
Note:
The number of matches can differ from the one shown in the above output.
My Output:
Step 10
Before continuing on to the next exercise, remove the access-group you applied to GigabitEthernet 0/0.
Type the following commands (press Enter after each command):
NYEDGE1#
configure terminal
NYEDGE1(config)#
interface gigabitethernet 0/0
NYEDGE1(config-if)#
no ip access-group 10 in
NYEDGE1(config-if)#
exit
NYEDGE1(config)#
exit
You will see the following output:
NYEDGE1#configure terminal
Enter configuration commands, one per line.  End with CNTL/Z.
NYEDGE1(config)#interface gigabitethernet 0/0
NYEDGE1(config-if)#no ip access-group 10 in
NYEDGE1(config-if)#exit
NYEDGE1(config)#exit
NYEDGE1#
IMPORTANT COMMANDS FOR STANDARD ACCESS LISTS:
Create Access List:
NYEDGE1(config)#
access-list 10 deny host 192.168.16.10
Show Access List:
NYEDGE1#
show access-lists
Apply Access List to Interface:
NYEDGE1(config)#
interface gigabitethernet 0/0
NYEDGE1(config-if)#
ip access-group 10 in
Remove Access List from Interface:
NYEDGE1(config)#
interface gigabitethernet 0/0
NYEDGE1(config-if)#
no ip access-group 10 in
Task 2 – Create an Extended Access-List
The benefits of extended access lists are that you can be much more granular in what you want to permit and deny.
In this task, you will create an extended access list. You will now configure an access list that permits FTP but denies ICMP on NYEDGE1.
Step 1
Connect to NYEDGE1.
Configure access-list 110, allowing FTP by typing the following commands (press Enter after each command):
NYEDGE1#
configure terminal
NYEDGE1(config)#
access-list 110 permit tcp host 192.168.16.10 any eq ftp
NYEDGE1(config)#
access-list 110 permit tcp host 192.168.16.10 any eq ftp-data
You will see the following output:
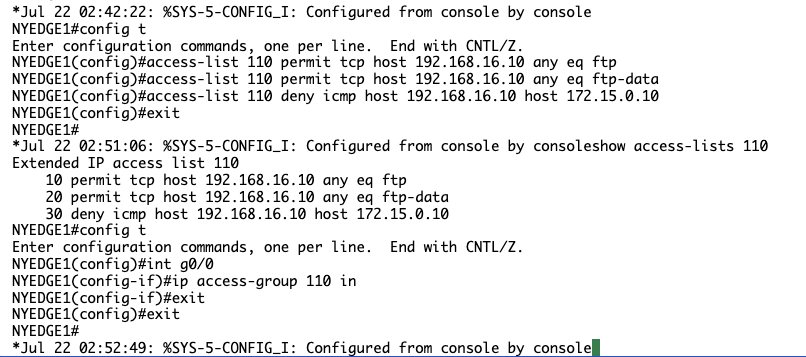
NYEDGE1#configure terminal
Enter configuration commands, one per line.  End with CNTL/Z.
NYEDGE1(config)#access-list 110 permit tcp host 192.168.16.10 any eq ftp
NYEDGE1(config)#access-list 110 permit tcp host 192.168.16.10 any eq ftp-data
NYEDGE1(config)#
My Output:

You must create two access list entries because
FTP
uses two ports:
20
for data and
21
for control information. For well-known ports, keywords can be used instead of the port numbers.
Step 2
Next, within the same access list, deny ICMP specifically to www.practice-labs .com, which corresponds to an IP address of 172.15.0.10, remembering that ICMP is a protocol.
Type the following commands (press Enter after each command):
NYEDGE1(config)#
access-list 110 deny icmp host 192.168.16.10 host 172.15.0.10
NYEDGE1(config)#
exit
You will see the following output:
NYEDGE1(config)#access-list 110 deny icmp host 192.168.16.10 host 172.15.0.10
NYEDGE1(config)#exit
NYEDGE1#
Step 3
Examine your access list now and remember that there is an implicit deny at the end of the list.
Type the following command:
NYEDGE1#
show access-lists 110
Press Enter.
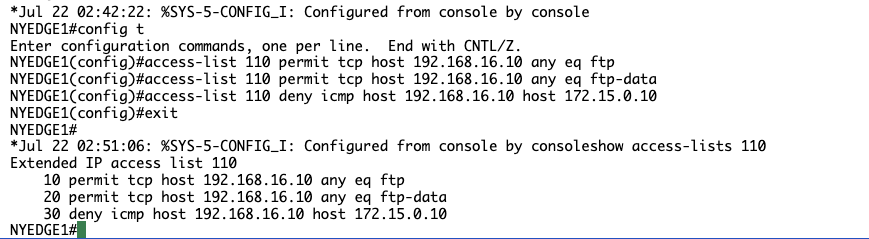
You will see the following output:
NYEDGE1#show access-lists 110
Extended IP access list 110
    10 permit tcp host 192.168.16.10 any eq ftp
    20 permit tcp host 192.168.16.10 any eq ftp-data
    30 deny icmp host 192.168.16.10 host 172.15.0.10
NYEDGE1#
My Output:
Step 4
Apply the access list to interface GigabitEthernet 0/0 inbound by typing the following commands (press Enter after each command):
NYEDGE1#
configure terminal
NYEDGE1(config)#
interface gigabitethernet 0/0
NYEDGE1(config-if)#
ip access-group 110 in
NYEDGE1(config-if)#
exit
NYEDGE1(config)#
exit
You will see the following output:
NYEDGE1#configure terminal
Enter configuration commands, one per line.  End with CNTL/Z.
NYEDGE1(config)#interface gigabitethernet 0/0
NYEDGE1(config-if)#ip access-group 110 in
NYEDGE1(config-if)#exit
NYEDGE1(config)#exit
NYEDGE1#
My Output:
Note:
You can only have one
access-group
per interface per direction. The above command will replace any other
inbound access-group
that may have been configured on this interface.
Step 5
Connect to PLABCSCO01.
Next, test the configuration using PLABCSCO01. First, try a ping to www.practice-labs.com then try and use FTP from within the command prompt.
Type the following commands:
ping www.practice-labs.com
Press Enter.
ftp www.practice-labs.com
Press Enter.
User (www.practice-labs.com:(none)):
anonymous
Password:
Passw0rd
Press Enter.
Ping Fails but FTP is successful
Step 6
Finally, review the access list hits once more.
Connect to NYEDGE1 and type the following command:
NYEDGE1#
show access-lists 110
Press Enter.
You will see the following output:
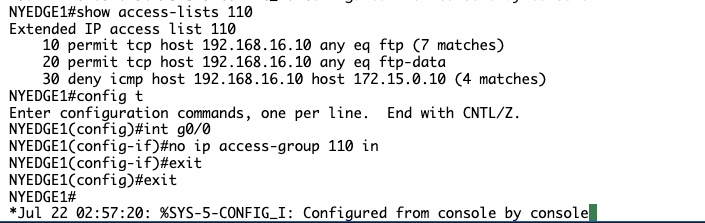
NYEDGE1#show access-lists 110
Extended IP access list 110
    10 permit tcp host 192.168.16.10 any eq ftp (21 matches)
    20 permit tcp host 192.168.16.10 any eq ftp-data
    30 deny icmp host 192.168.16.10 host 172.15.0.10 (10 matches)
NYEDGE1#
My Output:

Note:
No matches have been registered on line
20
of the access list because no file transfers have been initiated. Port
21,
which corresponds to the
ftp-data
keyword, is used for the actual transfer of files in FTP.
Step 7
Before continuing on to the next exercise, remove the access-group you applied to GigabitEthernet 0/0.
Type the following commands (press Enter after each command):
NYEDGE1#
configure terminal
NYEDGE1(config)#
interface gigabitethernet 0/0
NYEDGE1(config-if)#
no ip access-group 110 in
NYEDGE1(config-if)#
exit
NYEDGE1(config)#
exit
You will see the following output:
NYEDGE1#configure terminal
Enter configuration commands, one per line.  End with CNTL/Z.
NYEDGE1(config)#interface gigabitethernet 0/0
NYEDGE1(config-if)#no ip access-group 110 in
NYEDGE1(config-if)#exit
NYEDGE1(config)#exit
NYEDGE1#
My Output:
IMPORTANT EXTENDED ACCESS LIST COMMANDS
Create Extended Access List:
access-list 110 permit tcp host 192.168.16.10 any eq ftp
access-list 110 permit tcp host 192.168.16.10 any eq ftp-data
access-list 110 deny icmp host 192.168.16.10 host 172.15.0.10
Apply Extended Access List:
int 0/0
ip access-group 110 in
View Access List Rules stats:
show access-lists 110
Remove access-list from interface:
int 0/0
no ip access-group 110 in
Named Access Lists
Exercise 2 – Configuring Named Access Lists
In the previous exercise, you configured standard and extended numbered access lists. In this exercise, you will create the same access lists, but this time, they will be named.
Task 1 – Configuring a Named Access-List
In this task, you will configure a named access-list to allow FTP traffic from the Cisco Tool server to host 172.15.0.10 but deny ICMP traffic between these two hosts.
Step 1
Create a named extended access list called permit-ftp, allowing FTP from 192.168.16.10 to 172.15.0.10. In the same access list, block ICMP.
Type the following commands:
NYEDGE1#
configure terminal
Press Enter.
NYEDGE1(config)#
ip access-list extended permit-ftp
Press Enter.
NYEDGE1(config-ext-nacl)#
permit tcp host 192.168.16.10 host 172.15.0.10 eq ftp
Press Enter.
NYEDGE1(config-ext-nacl)#
deny icmp host 192.168.16.10 any
Press Enter.
NYEDGE1(config-ext-nacl)#
exit
Press Enter.
NYEDGE1(config)#
exit
Press Enter.
You will see the following output:
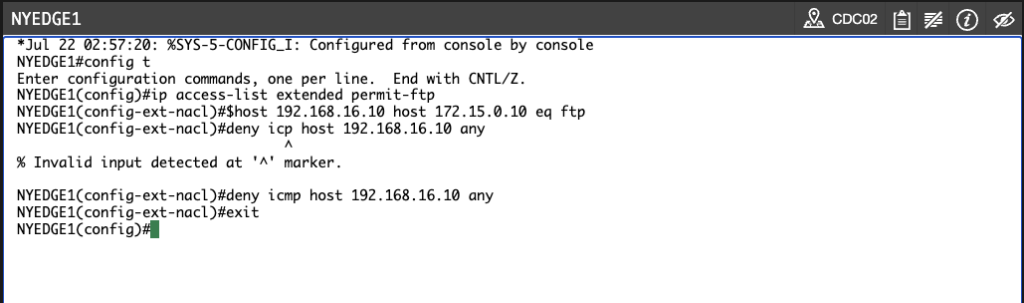
NYEDGE1#configure terminal
Enter configuration commands, one per line.  End with CNTL/Z.
NYEDGE1(config)#ip access-list extended permit-ftp
NYEDGE1(config-ext-nacl)#permit tcp host 192.168.16.10 host 172.15.0.10 eq ftp
NYEDGE1(config-ext-nacl)#deny icmp host 192.168.16.10 any
NYEDGE1(config-ext-nacl)#exit
NYEDGE1(config)#exit
NYEDGE1#
My Output:
Note:
One of the major differences between
numbered
and
named
access lists is that
named
access lists bring you into an
access list configuration mode
where you can input all of your configuration parameters. This is denoted by the
NYEDGE1(config-ext-nacl)#
prompt.
Step 2
View the access list by typing the following command:
NYEDGE1#
show ip access-lists permit-ftp
Press Enter.
You will see the following output:
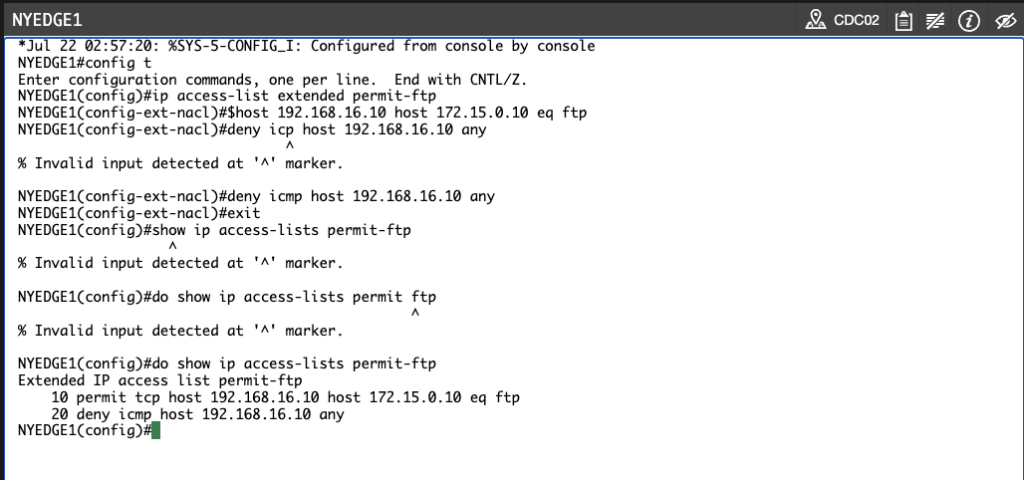
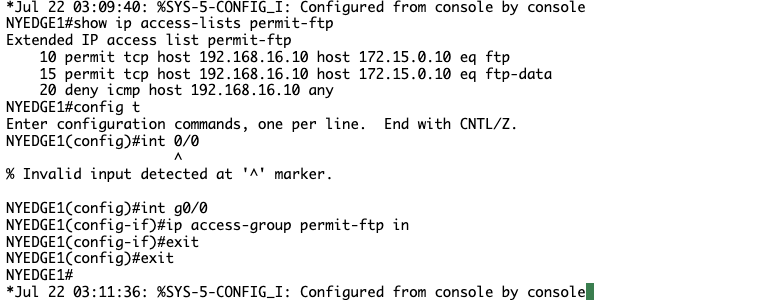
NYEDGE1#show ip access-lists permit-ftp
Extended IP access list permit-ftp
    10 permit tcp host 192.168.16.10 host 172.15.0.10 eq ftp
    20 deny icmp host 192.168.16.10 any
NYEDGE1#
Take a closer look at the above access list. You didn’t include the line which permits the ftp-data port.
My Output: Few typos, more caffeine anyone?
Step 3
One of the advantages of using named access lists is that you can insert entries into any position of the access list, assuming there is a line number free where you want to insert the new entry.
Line numbers by default are assigned in 10s for this purpose.
The new line should be placed in between existing access list entries numbers 10 and 20. Put the ftp-data line in at number 15, allowing you to add further entries above and below this point in the future.
Type the following commands:
NYEDGE1#
configure terminal
Press Enter.
NYEDGE1(config)#
ip access-list extended permit-ftp
Press Enter.
NYEDGE1(config-ext-nacl)#
15 permit tcp host 192.168.16.10 host 172.15.0.10 eq ftp-data
Press Enter.
NYEDGE1(config-ext-nacl)#
exit
Press Enter.
NYEDGE1(config)#
exit
Press Enter.
You will see the following output:
NYEDGE1#configure terminal
Enter configuration commands, one per line.  End with CNTL/Z.
NYEDGE1(config)#ip access-list extended permit-ftp
NYEDGE1(config-ext-nacl)#15 permit tcp host 192.168.16.10 host 172.15.0.10 eq ftp-data
NYEDGE1(config-ext-nacl)#exit
NYEDGE1(config)#exit
NYEDGE1#
My Output:

Step 4
View the access list once more by typing the following command:
NYEDGE1#
show ip access-lists permit-ftp
Press Enter.
You will see the following output:
NYEDGE1#show ip access-lists permit-ftp
Extended IP access list permit-ftp
    10 permit tcp host 192.168.16.10 host 172.15.0.10 eq ftp
    15 permit tcp host 192.168.16.10 host 172.15.0.10 eq ftp-data
    20 deny icmp host 192.168.16.10 any
NYEDGE1#
The new entry has been inserted successfully.
Step 5
Apply the named access list to the interface. Type the following commands:
NYEDGE1#
configure terminal
Press Enter.
NYEDGE1(config)#
interface gigabitEthernet 0/0
Press Enter.
NYEDGE1(config-if)#
ip access-group permit-ftp in
Press Enter.
NYEDGE1(config-if)#
exit
Press Enter.
NYEDGE1(config)#
exit
You will see the following output:
NYEDGE1#configure terminal
Enter configuration commands, one per line.  End with CNTL/Z.
NYEDGE1(config)#interface gigabitEthernet 0/0
NYEDGE1(config-if)#ip access-group permit-ftp in
NYEDGE1(config-if)#exit
NYEDGE1(config)#exit
NYEDGE1#
My Output:
Step 6
Connect to PLABCSCO01. Open a new Command Prompt window.
Test your configuration using the PLABCSCO01 server by typing the following commands:
ping www.practice-labs.com
Press Enter.
Ping timed out
Step 7
Connect to NYEDGE1.
When troubleshooting connections through your access list, sometimes it’s helpful to reset the match counters. In this step, you will clear the counters.
First, display the access list information with the following command:
NYEDGE1#
show ip access-lists permit-ftp
Press Enter.
You will see the following output:
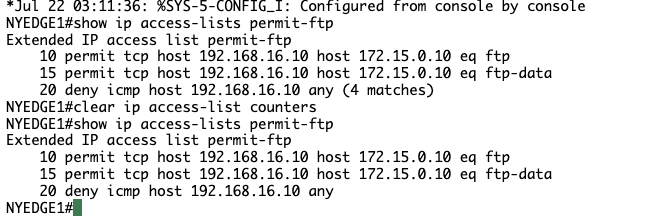
NYEDGE1#show ip access-lists permit-ftp
Extended IP access list permit-ftp
    10 permit tcp host 192.168.16.10 host 172.15.0.10 eq ftp (21 matches)
    15 permit tcp host 192.168.16.10 host 172.15.0.10 eq ftp-data
    20 deny icmp host 192.168.16.10 any (12 matches)
NYEDGE1#
Next, issue the following command to clear the counters by typing:
NYEDGE1#
clear ip access-list counters
Press Enter.
The output will be as follows:
NYEDGE1# clear ip access-list counters
NYEDGE1#
Note:
Note that this command clears the counters for all access lists. To specify the specific access list for which you want to clear counters, use the
clear ip access-list counters XX
command where
XX
is either the access list
number
or access list
name
.
You can check to see that the counters have been reset by typing the following commands (press Enter after each command):
NYEDGE1#
clear ip access-list counters
NYEDGE1#
show ip access-lists permit-ftp
You will see the following output:
NYEDGE1#clear ip access-list counters
NYEDGE1#show ip access-lists permit-ftp
Extended IP access list permit-ftp
    10 permit tcp host 192.168.16.10 host 172.15.0.10 eq ftp
    15 permit tcp host 192.168.16.10 host 172.15.0.10 eq ftp-data
    20 deny icmp host 192.168.16.10 any
NYEDGE1#
My Output:
COMMAND: clear ip access-list counters (Clears counters for all access lists)
Step 8
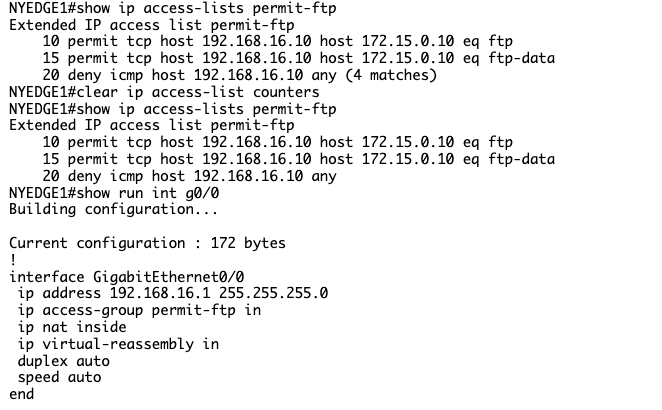
Before finishing off this exercise, it’s important to be able to see what access lists are being applied to an interface. Here are two approaches you can use:
First, you can view the running configuration of the interface in question.
Type the following command:
NYEDGE1#
show run interface gigabitethernet 0/0
Press Enter.
You will see the following output:
NYEDGE1#show run interface gigabitethernet 0/0
Building configuration...
Current configuration : 172 bytes
!
interface GigabitEthernet0/0
 ip address 192.168.16.1 255.255.255.0
 ip access-group permit-ftp in
 ip nat inside
 ip virtual-reassembly in
 duplex auto
 speed auto
end
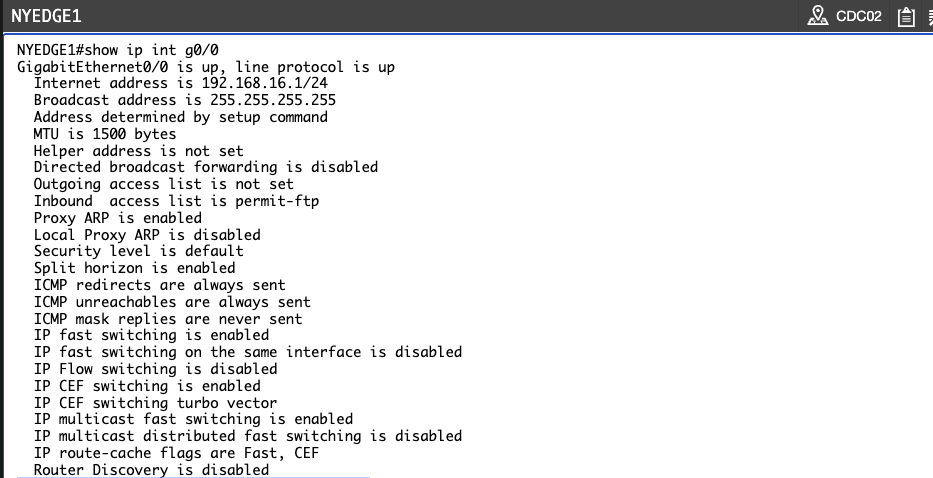
You can also use the show ip interface command; this shows which inbound and outbound access lists are set.
Type the following command:
show ip interface gigabitethernet 0/0
Press Enter.
You will see the following output:
NYEDGE1#show ip interface gigabitethernet 0/0
GigabitEthernet0/0 is up, line protocol is up
  Internet address is 192.168.16.1/24
  Broadcast address is 255.255.255.255
  Address determined by setup command
  MTU is 1500 bytes
  Helper address is not set
  Directed broadcast forwarding is disabled
  Outgoing access list is not set
  Inbound  access list is permit-ftp
!<-- Output omitted -->
My Output:
Restrict Remote Access
Exercise 3 – Configuring Access-Lists to Restrict Remote Access
In the previous exercises, you created access lists that block network traffic flowing in or out of a router interface. What if you wanted to restrict which IP addresses could actually access your router remotely? In this exercise, we will look at this further.
Task 1 – Configuring Remote Access
In this task, you will use your knowledge of access lists to restrict access to NYEDGE2. For this purpose, you will create a standard access-list and apply it to vty lines. When you apply access-list to vty lines, you limit users that have SSH/telnet access to the device.
Step 1
Connect to NYEDGE2.
First, to prove that access to the router will be blocked, you must first configure a password so that when you use PLABCSCO01 to access the router remotely, you can actually login.
You will configure a password as cisco.
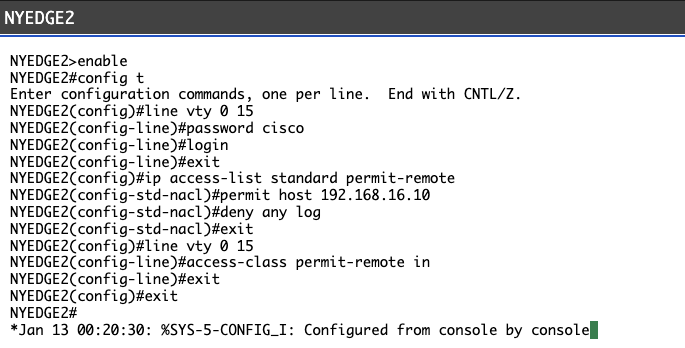
Type the following commands (press Enter after each command):
NYEDGE2#
configure terminal
NYEDGE2(config)#
line vty 0 15
NYEDGE2(config-line)#
password cisco
NYEDGE2(config-line)#
login
NYEDGE2(config-line)#
exit
You will see the following output:
NYEDGE2#configure terminal
Enter configuration commands, one per line.  End with CNTL/Z.
NYEDGE2(config)#line vty 0 15
NYEDGE2(config-line)#password cisco
NYEDGE2(config-line)#login
NYEDGE2(config-line)#exit
NYEDGE2(config)#
Step 2
Next, create a named standard access list called permit-remote, allowing 192.168.16.10, and denying anything else.
Add the log keyword to deny any entry in order to log all denied attempts.
Type the following commands (press Enter after each command):
NYEDGE2(config)#
ip access-list standard permit-remote
NYEDGE2(config-std-nacl)#
permit host 192.168.16.10
NYEDGE2(config-std-nacl)#
deny any log
NYEDGE2(config-std-nacl)#
exit
You will see the following output:
NYEDGE2(config)#ip access-list standard permit-remote
NYEDGE2(config-std-nacl)#permit host 192.168.16.10
NYEDGE2(config-std-nacl)#deny any log
NYEDGE2(config-std-nacl)#exit
NYEDGE2(config)#
Step 3
Next, apply this access list to the VTY lines.
This application differs slightly from the way you applied the access lists to interfaces. On the VTY lines, you must use the access-class command.
Remember that the VTY lines are essentially virtual connection points where remote connections via Telnet or SSH can be established.
Type the following commands (press Enter after each command):
NYEDGE2(config)#
line vty 0 15
NYEDGE2(config-line)#
access-class permit-remote in
NYEDGE2(config-line)#
exit
NYEDGE2(config)#
exit
You will see the following output:
NYEDGE2(config)#line vty 0 15
NYEDGE2(config-line)#access-class permit-remote in
NYEDGE2(config-line)#exit
NYEDGE2(config)#exit
NYEDGE2#
My Output:
COMMAND: access-class permit-remote in (apply access list rules to a line interface)
Step 4
Connect to PLABCSCO01.
To confirm your configuration, use PLABCSCO01 to telnet to the router.
Open Putty located on the desktop.
Ensure the Connection type: is set to Telnet.
The Host Name (or IP address) field should be set to the NYEDGE2 GigabitEthernet 0/0 address of:
192.168.16.2
Click Open.
Step 5
You should be prompted for a password. Enter the following:
cisco
Press Enter.
Step 6
You should now be logged in.
Command prompt should read: NYEDGE2>
Step 7
Connect to NYEDGE2.
Observe the access-list counters on NYEDGE2. Type the following command:
NYEDGE2#
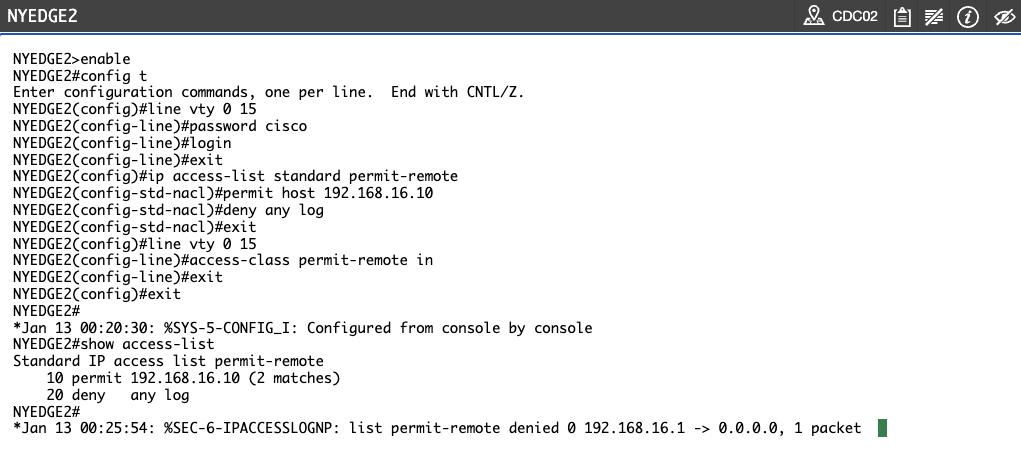
show access-list
Press Enter.
You will see the following output:
NYEDGE2#show access-list
Standard IP access list permit-remote
    10 permit 192.168.16.10 (6 matches)
    20 deny   any log
NYEDGE2#
Step 8
Connect to NYEDGE1.
Now try and telnet from NYEDGE1. Type the following command:
NYEDGE1#
telnet 192.168.16.2
Press Enter.
You will see the following output:
NYEDGE1#telnet 192.168.16.2
Trying 192.168.16.2 ...
% Connection timed out; remote host not responding
NYEDGE1#
Reconnect to NYEDGE2.
Because you configured a deny log at the end of the access list, if you have a look at the console of NYEDGE2 you should see syslog messages similar to the following:
Aug 12 11:02:49: %SEC-6-IPACCESSLOGNP: list permit-remote denied 0 192.168.16.1 -> 0.0.0.0, 1 packet
As you can see, access lists have many uses, and securing access to your devices is very important and should be done on all your networking equipment, especially any devices that are exposed to the Internet or any insecure environment.
My Output:
When applying access lists to vty line remember access-class
You completed the following exercises:
- Exercise 1 – Configuring Standard and Extended Access Lists
- Exercise 2 – Configuring Named Access Lists
- Exercise 3 – Configuring Access-Lists to Restrict Remote Access
You should now be able to:
- Create Standard Access-Lists
- Create an Extended Access-List
- Configure a Named Access-List
- Configure Remote Access


Leave a Reply